

Appearance
Adding & Editing a Location
Every field on the location form, including address autocomplete, geocoding, and the map pin.
Overview
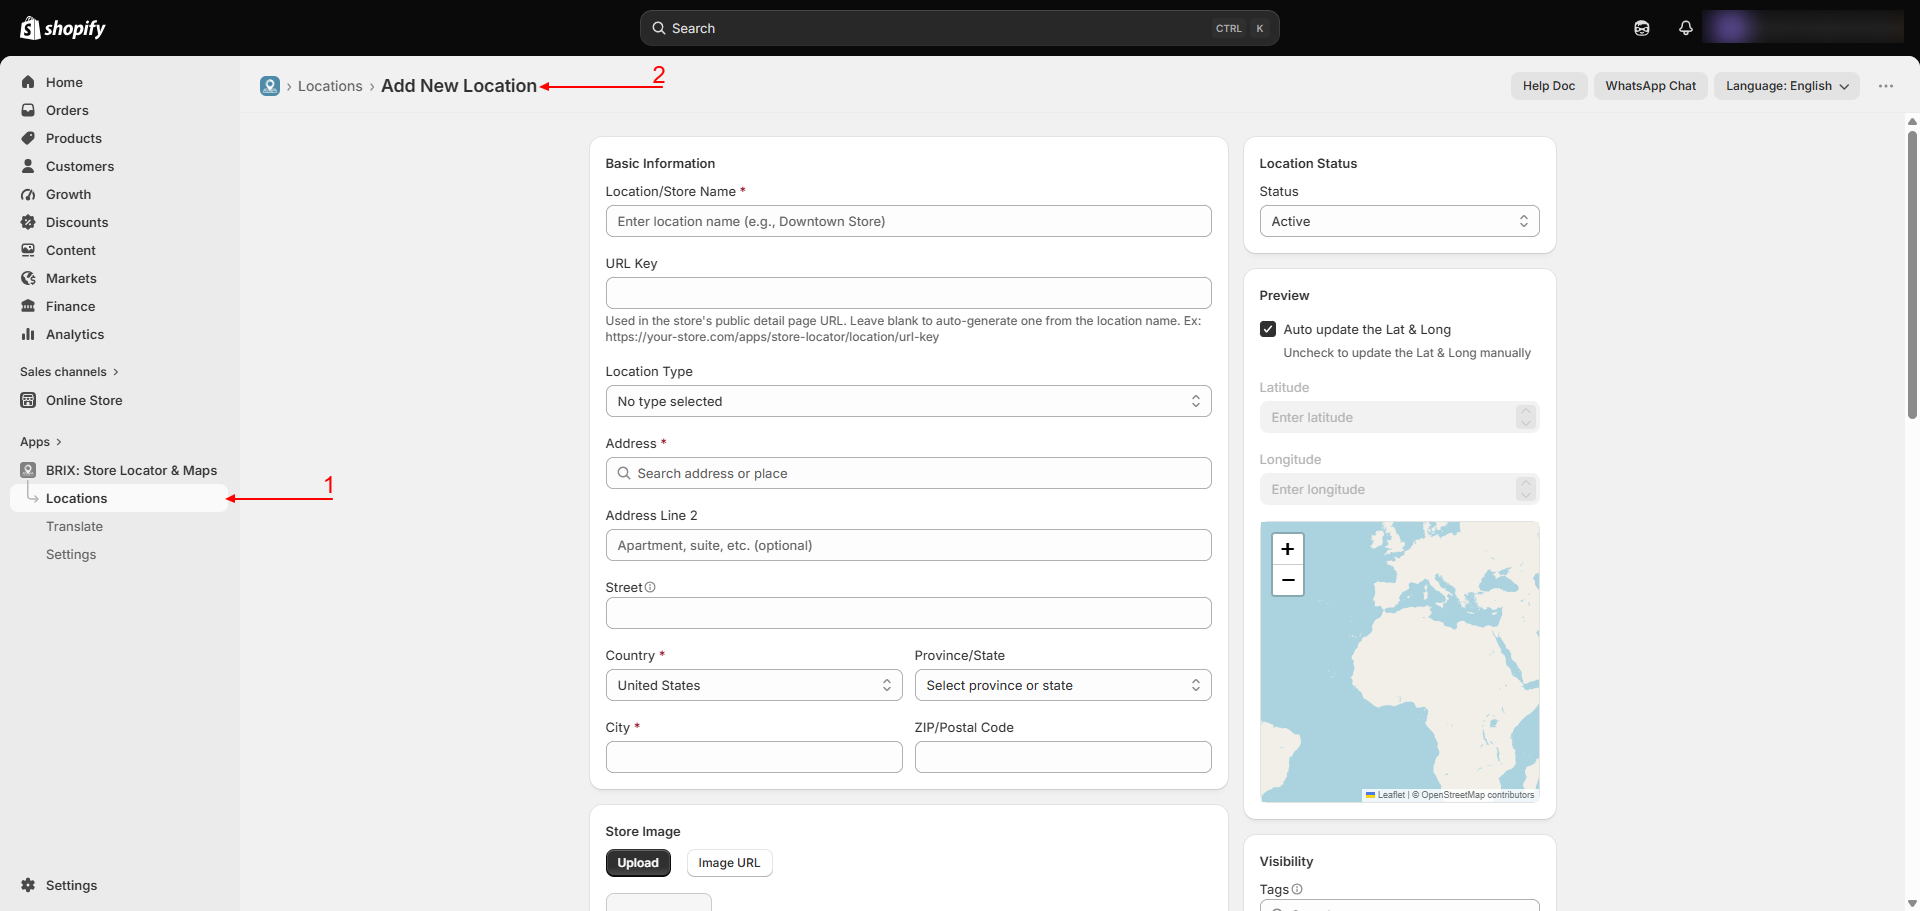
Add Location and Edit Location use the same form: Basic Information, Store Image, Contact Information, Description, Working Hours, and Products down the main column, with Location Status, Map Preview, Visibility, and SEO alongside. Name, Address, City, and Country are required - everything else is optional.
Benefits
- One form covers every customer-facing detail - contact info, hours, products, images, and SEO
- Address autocomplete and automatic geocoding mean you rarely have to place the map pin by hand
- A live map preview lets you fine-tune the exact pin position before saving
Where to Find It
Apps → BRIX: Store Locator & Maps → Locations → Add Location (or click an existing location to edit it)
How to Use
- Basic Information - enter the Location/Store Name (required), an optional URL Key (auto-generated from the name if left blank - see SEO Store Pages), and a Location Type (Retail, Warehouse, Dealer, Other, or none). Start typing in Address and pick a suggestion from the autocomplete dropdown, or type a full address and move on - either way the app geocodes it automatically in the background. Fill in Address Line 2, Street, Country, Province/State, City (required), and ZIP/Postal Code as needed.
- Store Image - switch between Upload (choose an image file, up to 2MB) and Image URL (paste a hosted image link).
- Contact Information - add a phone number (with country code), website, email, a custom "Web Text" link label, and any number of social links (Facebook, Instagram, X, LinkedIn, YouTube, TikTok, Pinterest, WhatsApp, Snapchat, or Other).
- Description - write a rich-text description using the built-in editor (bold/italic/underline, lists, links, font color, and more).
- Working Hours - turn on "Enable working hours", then set Open/Close and optional Break times for each day of the week. Use the copy-hours control to apply one day's hours to another day, or to the whole week.
- Products - click Browse Products to open Shopify's product picker and attach specific products and variants to this location.
- Custom Fields (only shown once you've created custom fields) - fill in the value for each field defined in Custom Fields.
- In the side column, set Location Status (Active/Inactive), and fine-tune the pin under Preview - it's placed automatically from your address, but you can uncheck "Auto update the Lat & Long" and drag the pin (or edit Latitude/Longitude directly) to correct it, which reverse-geocodes the new position.
- Add Tags and a Sort Order under Visibility, and optionally a custom Location Marker Icon URL.
- Set a Page Title and Meta Description under SEO for this location's public page - see SEO Store Pages (note: these only appear on the live page once the SEO theme snippet described there has been added to your theme).
- Click Save Location.
Tip Address suggestions and geocoding come from OpenStreetMap - see Map Provider - OpenStreetMap. Results can occasionally be sparse in areas with limited OpenStreetMap coverage; you can always type the full address and correct the pin manually if needed.
Available Settings
| Section | Fields |
|---|---|
| Basic Information | Name*, URL Key, Location Type, Address* (with autocomplete), Address Line 2, Street, Country*, Province/State, City*, ZIP/Postal Code |
| Store Image | Upload or Image URL |
| Contact Information | Phone, Website, Email, Web Text, Social links (10 platforms) |
| Description | Rich-text editor |
| Working Hours | Per-day Open/Close and Break From/To, with a copy-hours shortcut |
| Products | Linked products and variants via Shopify's product picker |
| Custom Fields | One field per custom field you've defined |
| Location Status | Active or Inactive |
| Map Preview | Latitude/Longitude, draggable pin, auto-update toggle |
| Visibility | Tags, Sort Order, Location Marker Icon URL |
| SEO | Page Title, Meta Description (require the SEO theme snippet to be added to your theme - see SEO Store Pages), Scripts (not currently used on the public page) |
* required
Best Practices
- Let auto-geocoding place the pin, and only turn off auto-update to nudge it - typing latitude/longitude by hand is easy to get wrong.
- Fill in working hours if you want the "Open Now" filter to be useful for customers - see Search & Filters.
- Keep tags short and consistent (for example "flagship" or "curbside-pickup") since customers filter by them on the storefront.
Notes
- Saving requires Name, Address, City, and Country at minimum; Email (if entered) must be a valid format, and any Link-type custom field must be a valid URL.
- The per-location "Scripts (Tracking Code)" field under SEO is not currently used on the public store page - it's reserved for future use.
Troubleshooting
The map pin is in the wrong place. Uncheck "Auto update the Lat & Long" and drag the pin to the correct spot, or enter Latitude/Longitude directly.
I can't save the location. Check the warning banner at the top of the form - it names the specific required field (Name, Address, City, or Country) that's still missing.
Address autocomplete isn't returning any suggestions. Type at least 3 characters and wait briefly - suggestions are debounced. Very rural or newly built addresses may not exist in OpenStreetMap yet; you can still save a manually typed address.